
Good night vision is something that we humans lack. As such, we must supplement our lack of night vision with tools. This technology may seem to be only of use to those in certain professions such as law enforcement or the military. However, there are many other situations in which night vision can be helpful.
When camping out in the woods, night time movement is sometimes required. While flashlights can be used, they only serve to illuminate the path in front of you. Having night vision would make it easier to identify what’s around you and where you can safely walk. The same is true for those who like to spend time looking at nocturnal animals.
Those who like to hunt or fish at night will appreciate the advantages of having night vision when trying to spot the prey and when trying to navigate in the dark. Search and rescue teams working hard to find someone in the dark will find it much easier to navigate both by foot and by boat. Finally, those involved in security details (both professional and community) will find night vision the perfect accessory to enable them to clearly see potential dangers.
DEFINITION
Although there are many tools available that offer night vision, this document will focus specifically on the use of night vision monoculars. To define a night vision monocular we can clearly say that it is a tool that offers a single eye piece and a single objective. That description may be confusing so just think of cutting a pair of binoculars in half and you’ll get the idea.
That said, do not be confused. Binoculars serve to magnify the image we see. Night vision monoculars do not magnify the image. Instead, their goal is to provide an image of area and its objects at night. Most monoculars are lightweight and small. The most basic models are held in the hand, but the more advanced models can be mounted on a variety of objects. A definite advantage to using night vision monoculars as opposed to goggles is that one eye will always be adjusted to the regular lighting conditions found in the area. Another advantage is that the exposed eye maintains its peripheral vision. The downside of a monocular device is that is does not provide any depth perception.
METHODS
When creating an image of an object at night, we humans rely on two main methods. These methods are thermal imaging and light amplification (I² technology). Each method functions in a different way and creates a different end result.
We’ll start by looking at thermal imaging. Devices that use thermal imaging are basically seeing and measuring the amount of heat that is emitted by people, animals or objects in a given area. These devices are not optical (i.e. no eye piece), but instead use a sensor called a microbalometer to read the difference in heat between an object and its environment. This data is then displayed on a screen in an image called a thermogram for the user to see. No light is required. This technology is sometimes referred to as FLIR (Forward Looking Infrared).
Light amplification (I² technology) is different. It does not see or read heat. Instead, it takes the amount of light available and amplifies it. By enhancing the amount of light, this device can provide a clearer image of objects at night. Simply put, this device takes the existing amount of light and magnifies it. This is done via an image intensifier tube. In the most basic models, light packets (photons) are captured on a photocathode plate, magnified and then sent down a tube to create the final image. In more advanced models, the light packets are enhanced even further by the use of a second plate called the microchannel plate.
No matter which model you choose, all light-amplification devices need light to function. This light can be already existing in the environment and simply manipulated by the device or an additional infrared light source can be added to assist the device. Most of the time, the image created will feature the colors of green and black. These colors were chosen because they give the highest amount of detail. However, some devices will offer black and white images. Although these images do not have as much detail, they are definitely not as bright and therefore a bit easier on the eye to use.
One other factor that affects I² technology is something called blooming. This term refers to the whiteout or temporary blindness that can occur when a bright light enters the field of vision. New technology known as Auto-Gating can reduce blooming and its disruption of vision. This technology was originally only found on the most advanced models, but can now be found on some of the mid-level devices as well.
JUDGING QUALITY
When it comes to a thermal imaging device, consumers should consider one main factor. That factor is resolution. Basic devices will provide a decent image with only 240 x 180 pixels per square inch. Mid-level devices offer a resolution of 320 x 240 pixels. For hand-held devices, look for a resolution of 640 x 480 pixels. Note that when you increase the number of pixels, the price will also increase. Other high-quality features to look for include the ability to capture both still and video images.
Determining the quality of an I² technology device is not quite as cut and dry. First, one must consider the different generations of this product. Each generation (1 – 3) offers different technology and quality. That said, most of the time, the quality of an I² product is determined by its image intensifier tube. The resolution of an I² device is measured in lines per millimeter (lp / lpm). Most feel that 45 lpm will suffice for average situations. However, many people prefer a resolution between 64 to 72 lpm. One word of caution applies here. Don’t think that you can purchase a device with a cheap eyepiece and objective and just add a high-quality image intensifier tube to get a great product at a cheap price. To get the best quality, you will need to have high-quality parts in the entire device.
MAINTENANCE AND CARE
If you have a thermal system, the only rule is to not drop it. With an I² technology, the same advice applies. However, there are additional actions that should be taken to preserve the life of the device. Use a protective case when the device is not in use and be sure to remove the batteries before storing it. Lens covers should be kept in place until you are ready to use the device. Consider adding a protective layer to your optical pieces. A glass filter will help to protect the actual lens from damage and dirt.
OTHER OPTIONS
You can purchase a device that combines both thermal imaging and I² technology. However, these devices are very expensive and quite often highly sought after by the military. Thus finding one will be challenging at best. A new night vision technology is developing. This uses digital technology to provide an image. Functioning much like a digital camera, this device uses CCD chips and CMOS chips to gather light to create an image. In contrast to a standard I² technology device, these digital versions are cheaper and more compatible with cameras. They are also not damaged when exposed to bright light. That said, their level of performance is really on par with a basic I² model, but it is improving quickly.
GENERATIONS
FLIR (Forward Looking Infrared) devices, otherwise known as thermal imaging, are sometimes referred to as having generations. However, those terms are often used only in a military setting or in relation to the products produced by a company that uses the name FLIR. As such, there is no specific set of standards that determines the generations of actual FLIR technology for civilian use.
I² technology, on the other hand, has a very clear set of standards to delineate its different generations. The first generation, known as Gen 1, is the simplest type of night vision available. It offers technology from the 1960s and as such is the least costly option. Being Gen 1 means that the device only has a photocathode plate and a basic image intensifier tube.
GEN 1
Gen 1 devices need ambient lighting as least as strong as a full moon to function or they must be equipped with an IR illuminator to provide the necessary light. While adding this infrared light can increase the ability of a Gen 1 device to see in darker areas, it also means that the user is now visible to other night vision device users. Furthermore, these add-on IR illuminators are often quite limited in their power. Due to this, images are often not as bright and have a lower resolution.
Users can detect a human-size object located approximately 75 to 100 yards away using a Gen 1 device. Being able to clearly recognize what that object is requires a closer distance of 50 to 75 yards. Obviously, objects smaller than a human will require even closer distances in both the detection and recognition ranges.
Furthermore, Gen 1 devices are very susceptible to blooming. This image distortion caused by bright lights can make it impossible to see at times. The field of view on a Gen 1 device is also distorted with somewhat of a fish-eye feel on the outer third of the lens.
The device will provide about 1500 hours of use before any parts need to be replaced and Gen 1 devices are usually not mountable on any external device such as a hat or weapon. In addition, Gen 1 devices have a shorter battery life and require a few seconds to turn on and off. Nevertheless, they are often perfect for those who are considered hobbyists.
When purchasing a Gen 1 device, consumers should know that the following factors can affect performance: intensifier tube, size of objective, magnification level and the use of an IR illuminator. Consumers may see the term Gen 1+ as being of higher quality. However, that term simply denotes that the device is made using a currently produced intensifier tube, not necessarily a higher-quality one.
GEN 2
Second generation night vision devices (known as Gen 2) definitely cost more money than the Gen 1 options. However, for that money, you also get a better product. First, Gen 2 devices are much smaller than Gen 1 devices. That is due to an improvement in the plate technology. Second, Gen 2 devices have a second plate, called a microchannel plate, that further amplifies the movement of the light packets. With the addition of this second plate, the images from a Gen 2 device have better resolution and therefore are much cleaner and brighter.
The technology is still a bit old as it is from the 1970s, however Gen 2 devices require less ambient light and do not need the addition of an IR illuminator. The improved technology means that users can detection a human-size object from about 200 yards away and recognize that object from just about 100 yards away.
Other improvements include no fish-eye distortion and less blooming (distortion due to bright lights). Furthermore, a Gen 2 device has a longer battery life and can be mounted on a variety of objects. A Gen 2 image intensifier tube will usually provide about 5000 hours of use before needing to be replaced. Some sites will refer to a Gen 2+ device. Such devices were created when the Russians took our Gen 2 technology, copied it and then improved it.
As with the Gen 1 devices, the most important factor is still the type and grade of image intensifier tube that is used. Nevertheless, good quality lens are also a must for reliable performance. Some Gen 2 devices have also been improved with the addition of the Auto-Gating technology to virtually eliminate blooming.
GEN 3
In keeping with the old saying “You get what you pay for.”, purchasing a Gen 3 device will cost you money. However, you will also receive quite a bit of quality and technology for the cost. Using technology developed in the 1990s, these devices offer more than 10,000 hours of night vision before needing to be replaced. They use gallium arsenide in their image intensifier tubes. This product is expensive, but it also provides the highest degrees of brightness and accuracy in night vision images.
It functions very well in areas of low-light and does not need an additional IR illuminator. In fact, it operates well in all light conditions. Because of this, it is almost impossible to be detected by another night vision device user. With Auto-Gating technology included, a Gen 3 device has almost zero blooming and no image distortion.
It offers both detection and recognition ranges of approximately 300 yards depending on the model chosen and the conditions in which it is used. Gen 3 devices are extremely versatile and can be mounted on almost any product. In addition, there are plenty of accessories to add to the device to improve its function or compatibility even further. For all of these reasons, Gen 3 devices are preferred and used by the military. In fact, they are so good that they are not allowed to be exported outside the United States.
Sometime the rating of Gen 3+ is used. This is the very highest quality of Gen 3 available. Some people would like to call it Gen 4, but that category has not yet been given permission to officially exist. Trying to define a Gen 3+ is a bit difficult. In the past, it meant that the device had Auto-Gating. However, now most Gen 3 devices and some Gen 2 devices have that technology. One thing that still sets Gen 3+ devices apart from other Gen 3 devices is the lack of (or a greatly reduced) ion barrier. Ion barriers prevent the movement of electrons. Gen 3+ devices can operate with a much higher sensitivity to light compared to Gen 3 devices.
In Gen 3, as with the other generations, the type and grade of image intensifier tube used has the greatest impact. Those tubes that meet military standards are often referred to as “Mil-spec.” Some tubes fail to meet “Mil-spec” and as such are categorized as “Commercial.” In the “Commercial” grade, there are two divisions. Grade A means that the device has missed achieving “Mil-spec” in one standard. Grade B devices have missed meeting “Mil-spec” in several standards. No matter which type you choose, remember that the resolution offered is still the best predictor of image quality.
BEST OPTIONS
There are many companies that product night vision monoculars. Here is a list of some of the top manufacturers.
- ATN
- Armasight
- Bering Optics
- Bushnell
- Firefield
- Luna Optics
- Night Optics
- Night Owl Optics
- Pulsar
- SightMark
- US Night Vision
BEST OVERALL MONOCULAR
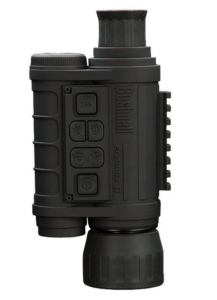 Digital Gen 1 products are becoming popular because they provide the quality of a Gen 2 device at the cost of a Gen 1 product. For this reason, our top pick is the Bushnell Equinox Z Digital. This product offers a 1-3x magnification and a 50 mm lens. Its viewing range is just about 984 feet and it comes with a infrared illuminator. It also comes with additional features such as image capture, video recording, daytime color and the ability to be mounted on a tripod. It features glass objectives, an adjustable IR brightness control and comes with a carrying case.
BEST NIGHT VISION MONOCULAR FOR THE MONEY
For the cost, the Bushnell Night Watch with Built in Infrared Monocular is a great option. This Gen 1 device has a scope that offers 2x magnification. It also comes with a rubber-armored grip and a built-in tripod mount. These last two features are somewhat unusual for a Gen 1 product. Rather than having to add an IR illuminator, this device comes with one already built-in. Its has a viewing range of 5-400 and is compact enough to slip into your bag. It comes with its own case and a lanyard for easy carrying.
BEST NIGHT VISION MONOCULAR UNDER $1000
 Getting a Gen 3 device for under $1,000 is almost unheard of. For that reason, we’ve chosen to recommend a Gen 2+ device instead. The Armasight Avenger Gen 2+ QS Quick Silver White Phosphor Night Vision Monocular provides advanced technology at a reasonably affordable price point. What makes this product a Gen 2+ is the ability to add high-performance Image Intensifier Tubes (IITs) using either Green Phosphor or Quick Silver. In addition to being able to enhance the product, this device can also be mounted on an object or carried as a hand-held device.As a standard Gen 2, it offers the resolution of 45 – 51 lpm and gives a magnification of 3x. Its lens is a wide 5 mm and it comes with automatic brightness control, automatic shut-off and a bright light cut-off system. It is water and fog resistant and can be adapted for use with cameras.
BEST NIGHT VISION MONOCULAR UNDER $500
Finding a Gen 2 under $500 is difficult, too. That’s why we’ve recommend a Gen 1+ instead. The Pulsar Challenger GS Super 1+ 3.5 x 50 offers lots of features that users will find helpful. First, it has a clear image that is free from any distortion across the entire field of view. Its Image Intensifier Tube is a CF-Super type that works with high-quality lens to accomplish this. It also has built-in magnification of 3.5x. The body of this device is completely sealed so that it can operate in virtually any weather condition. Like our previous pick, this device also has a built-in IR illuminator. However, it also offers a second mounting point to attach additional IR illuminators as needed. This Gen 2 device provides users with a few different compatibility options for use with helmets and googles. It comes with a power switch to prevent accidental powering. This device has a detection range of up to 750 feet and a lens of 50 mm. It comes with a carrying case and a built-in tripod socket for mounting.
BEST NIGHT VISION MONOCULAR UNDER $200
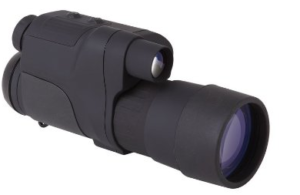 The Firefield FF24063 4 x 50 mm Night Vision Monocular is definitely only a Gen 1 product. That said, for its price, it offers ample features. First, its lens is a full 50 mm and it offers a magnification of 4x. Its detection range is just under 360 feet and it has an integrated IR illuminator. Despite being just a Gen 1 device, this product comes with a tripod mount at its base. The Firefield 4 x 50 mm is also quite durable and can withstand a wide range of temperatures. Its images are clear thanks to its high resolution and it comes with a carrying case and a lens cloth.
GENERATIONS
Rather than select only one product for each generation, we have decided to show you a few of the options available. This will allow you to get a feel for what’s out there as well as see the differences and similarities in the various products.
BEST GEN 1 NIGHT VISION MONOCULAR
#1 Sightmark 4×50 Gen 1 Eclipse Night Vision
The Sightmark Eclipse also uses digital technology. However it still manages to provide quite a bit of night vision. It has the benefit of delivering current black and white images rather than the old standard of green and black images. Its objective is 5 mm and it offers a magnification of 4x. It comes with its own carrying case and a lens cover.
#2 Night Owl Xgen 2.1x Digital Night Vision
The Night Owl Xgen also uses digital technology to increase the power of this Gen 1 device. Its magnification is 2x and the IR illuminator helps to provide clear images. This device features 5 different settings that are controlled via a single button making it very easy to use in the field. Nevertheless, it does not offer all of the features found in our #1 product.
BEST GEN 2 NIGHT VISION MONOCULAR
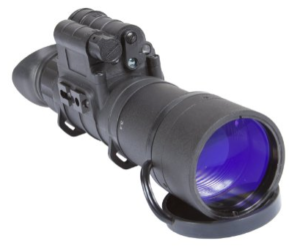
#1 Night Optics D-300 Generation 2+ Standard Night Vision
This Night Optics product provides a slew of features. It has a multi-stage IR illuminator that is high power, low battery and infrared indicators, and optics that meet Mil spec standards. Its body is very durable and can withstand any type of weather. Its mounts allow users to attach it to anything from weapons to headgear and it comes with a hard carrying case.
#2 Armasight Avenger Gen 2+ ID Improved Definition
The Armasight Avenger gives users a magnification of 3x and has a resolution of 45 – 51 lpm. It offers automatic brightness controls and an automatic shut-off system. Its infrared illuminator is built-in and comes with a flood lens. The lens itself is 50 mm and provides a clear range of focus. This device is also water and fog resistant so that it can be used in a variety of weather scenarios. The Armasight Avenger can be used as a hand-held device or mounted on another object as needed. It is also compatible for use with a camera or video recorder. To make it a Gen 2+ product, it can be fitted with Gen 2+ image intensifier tubes using either Green Phosphor or Quick Silver.
#3 ATN Night Spirit-2 Gen 2+ Night Vision
The ATN Night Spirit is a strong Gen 2 product that has a magnification of 3x and a 50 mm lens that has been coated with Proshield for protection. Its field of view is 18 degrees and it comes with the extra features of automatic brightness control and bright light shut off. Its IR illuminator and battery both come with indicators for ease in use. This device is both camera and video recorder adaptable and can be operated via a single switch knob. It offers weather resistant construction and can operate from -40 to + 50 degrees Celsius. Its resolution is between 40 and 45 lpm providing clear images. Mounting options allow this product to be attached to head gear or a helmet.
BEST GEN 3 NIGHT VISION MONOCULAR
 By the time you get into the Gen 3 products, the price tag has soared through the roof. Be prepared to spend more than one thousand dollars to own a Gen 3 device. As stated, Gen 3 devices tend to be used mostly by law enforcement and the military. Nevertheless, they are available for civilian use in some cases. Consumers should note that some Gen 3 products come with restrictions in purchase.
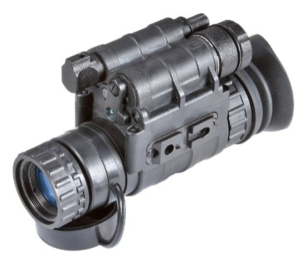
#1 Armasight OPMOD PVS-14 Gen 3 Alpha Night Vision
The Armasight OPMOD offers an image intensifier tube with high performance manual gain. Its resolution is 64 -72 lpm and its lens provides a full 40 degrees of field of view. Its magnification is only 1x, but with such a powerful device more magnification is not really needed. This Gen 3 product comes with all of the automatic controls and indicators available as well as a built-in IR illuminator. It can operate in extreme temperatures from -51 to +49 Celsius. It is waterproof and meets the Mil Spec standard 810. Mounting options include helmet, head, weapons, tripod, camera and video recorder. It can also function as a hand-held device when needed.
#2 Armasight Nyx14-3-Alpha MG Gen 3 Multi-Purpose Night Vision
For those that wish for a Gen 3 with more magnification options, the Armasight Nyx14-3-Alpha MG offers a good product. It provides just as high a resolution (64-72 lpm) as our other recommended Gen 3 product, but it comes with the option to add 3x, 5x, and 8x magnification. Its lens is only 27 mm, but it offers a full 40 degrees in the field of view. Both the built-in IR illuminator and the battery come with indicators that show in the field of view. This product also has desired automatic features such brightness control, bright light and shut-off. It is waterproof and surpasses Mil Spec 810. This means that this product can be used in virtually any weather condition. Accessories provide options for mounting on various devices.